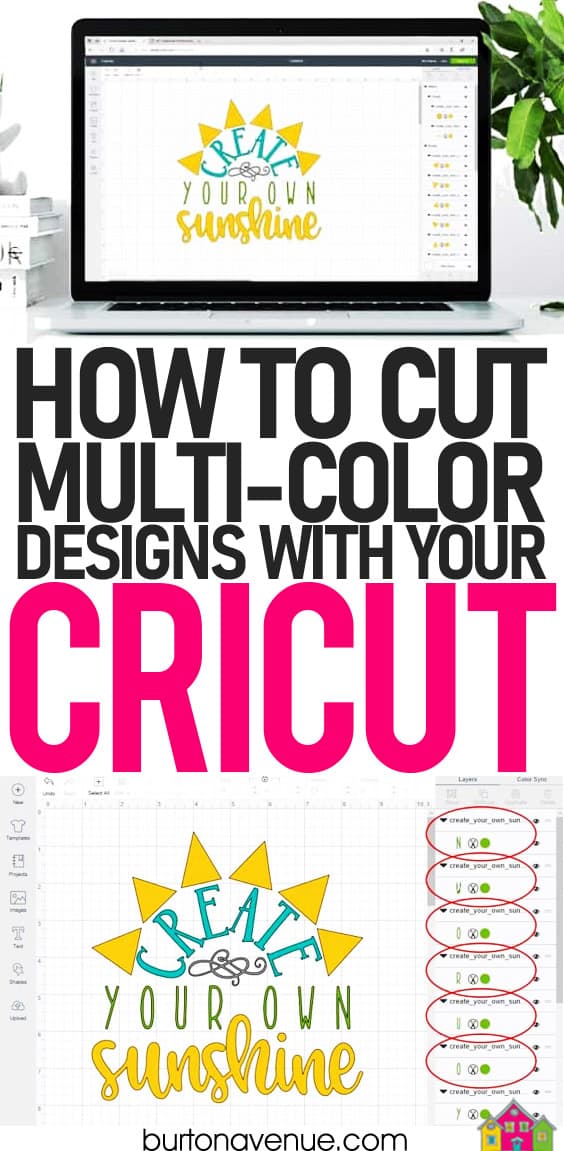
How to Upload Multicolor Design on Cricut Design Space
If you have ever wanted to cut a multi-colored pattern in Cricut Design Space, but have no thought where to start, you've come to the right place! Multi-color designs are super cute and lots of fun to make. Today, I'k going to walk you lot step by pace through the procedure of setting up your multi-color design in Blueprint Infinite. If you're a Silhouette user, learn how to cutting multi-color designs with this tutorial.
How to Cutting Multi-Colored Designs in Cricut Blueprint Infinite
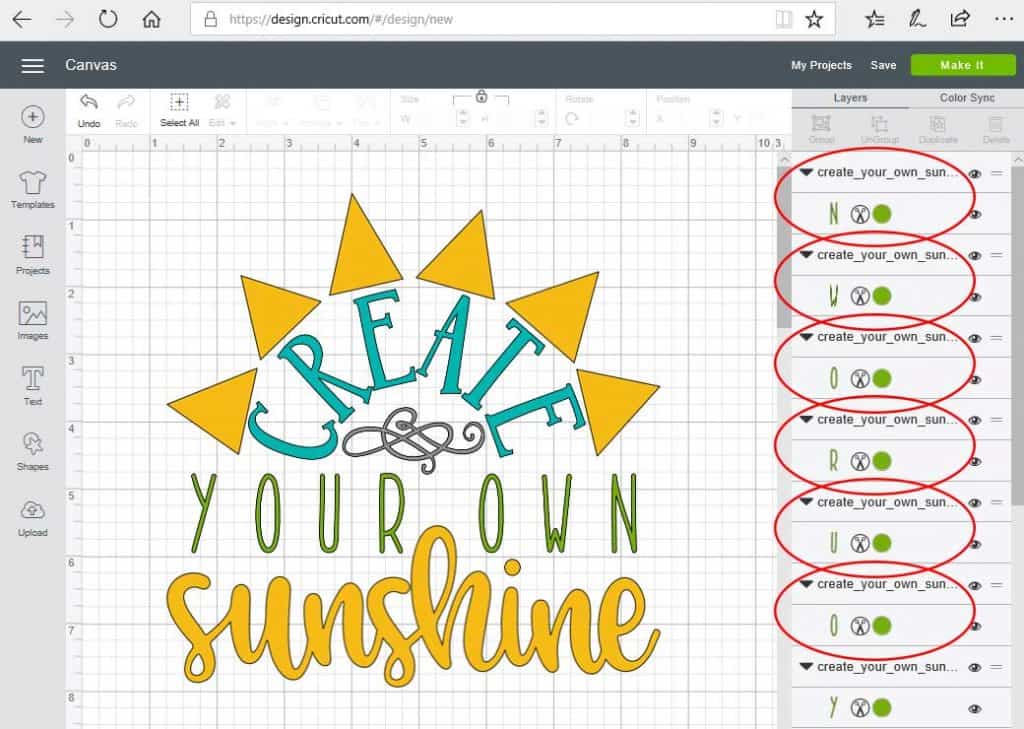
Start by importing your SVG into Pattern Infinite and resize information technology to the dimensions yous need. If you need assistance importing an SVG, follow this tutorial. For today's example, I'll be using this Create your own Sunshine file. You can download the file for costless here. When yous first import your blueprint into Design Space, everything is grouped together. For multiple-color designs, you need to ungroup the blueprint, so y'all can work with individual color groups. You ungroup by clicking on the pattern and so selecting the ungroup icon on the right (y'all can also correct-click and select ungroup). Once you lot've ungrouped the file, your panel on the correct should look like the image beneath. All of the elements of the same color are grouped under one pointer next to the file proper name.
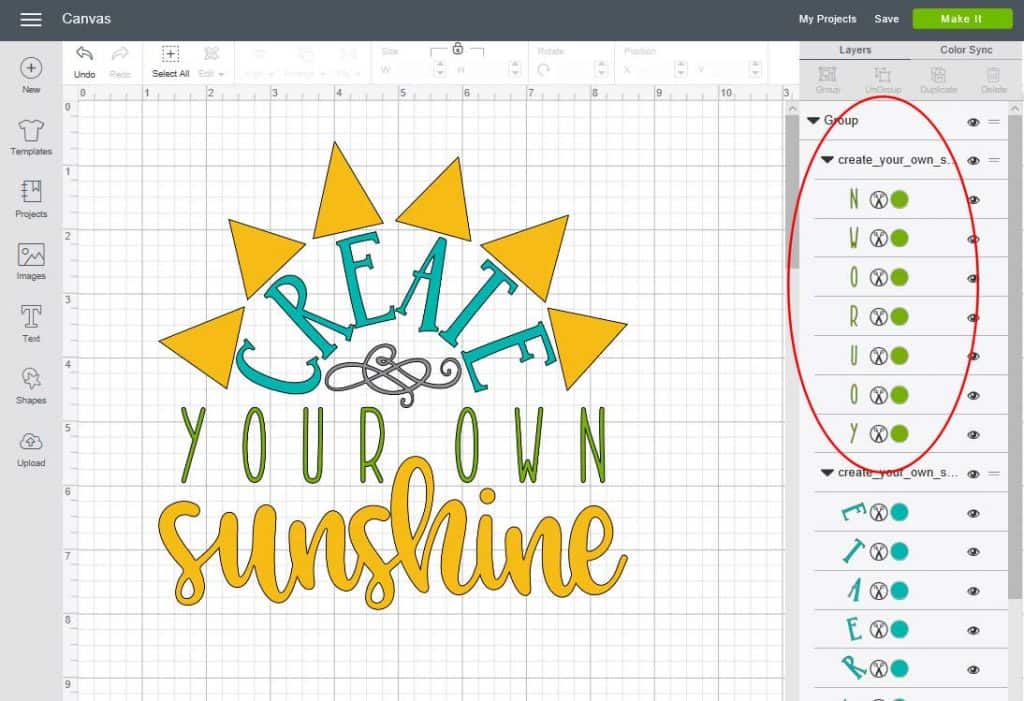
Every in one case in a while, you'll come beyond a file with elements that aren't grouped together, Each element will be under its own arrow and file name, as shown in the case below. If the file you're using appears like this, you'll need to grouping all the elements of the same color together. You can practice this by holding down your shift fundamental and so clicking on each element with your mouse. Then, right-click and choose group. So, in this case, if yous're group the green elements, you would hold downwards shift and click on the letters YOUROWN, and so correct-click and choose group. Echo with all the colors.
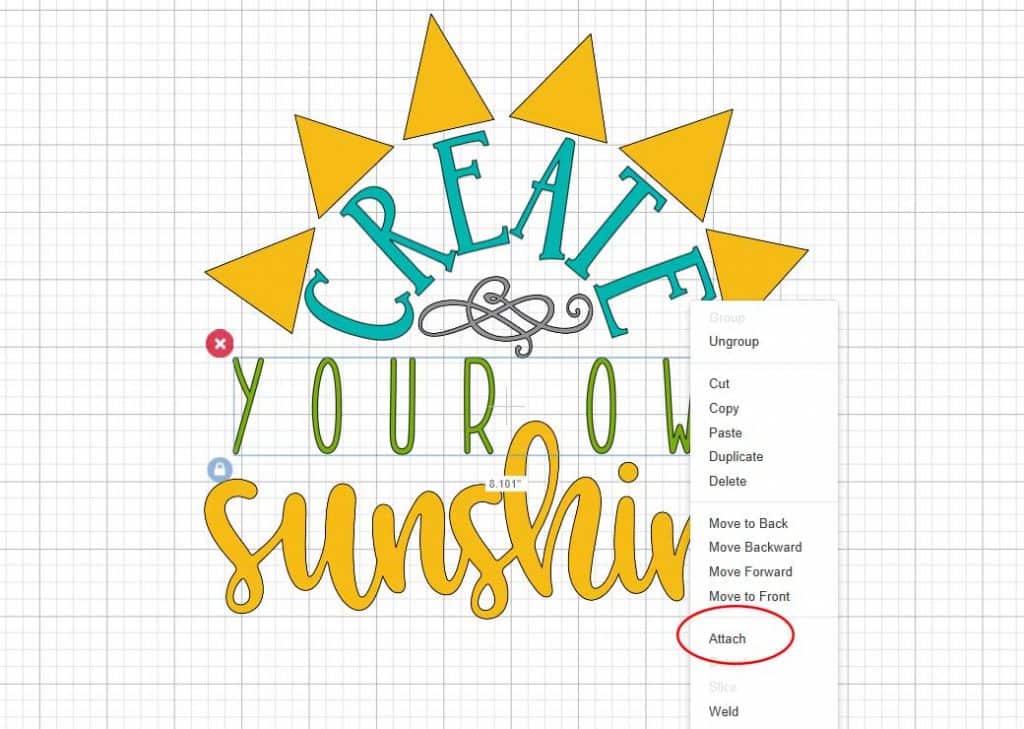
There might be times when yous want to change colors of elements in a grouping. Say y'all want the sunday rays to stay yellow, but you desire the word sunshine to be coral. Click on whatsoever element from the yellow grouping, right-click, and choose ungroup. At present, you can regroup the elements. Start with the sunrays. Concur down your shift key and then click on each sunday ray. Then, right-click and cull group. Side by side, hold down your shift key and click on the word sunshine and the dot of the i. Right-click and cull group. To change the color of the discussion sunshine, click on the word, right-click, and cull attach. Then, on the right-hand panel, double-click on one of the elements you want to change colors. A color box will slide out and you lot can selection your new colour.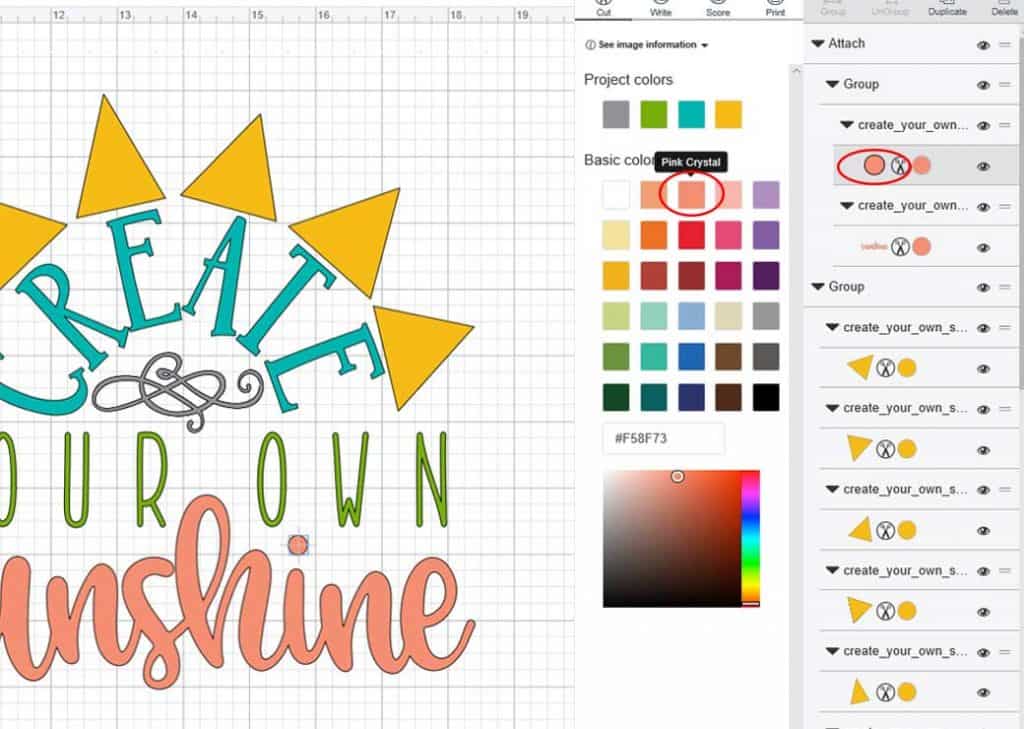
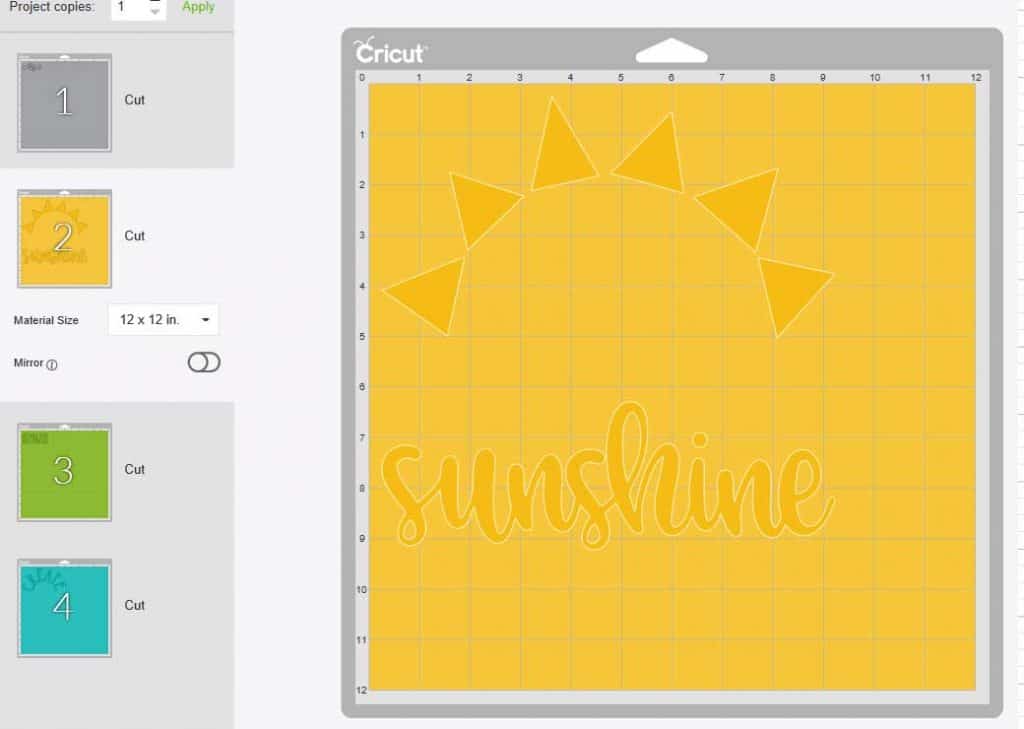
If you send the design to your cutter now, the program will adapt the elements like this on the mat. Each color volition exist on its own mat, simply it will change the lodge and layout of the individual elements. This is really confusing and is oftentimes where people become stuck. Luckily, there's 1 easy step that volition fix this trouble.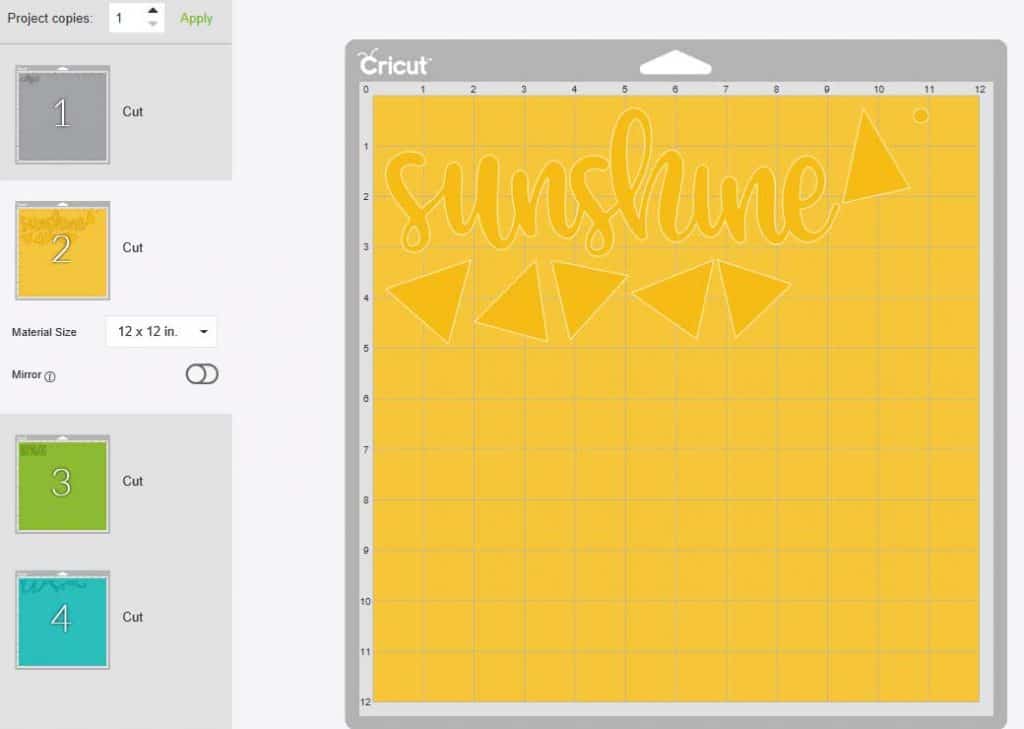
First, we are going to gear up the green group. Click on any element that is green, then right-click and choose attach. Clicking attach volition hold your cuts in the same position relative to each. If you don't click attach, the letters and elements will shift effectually when you transport the design to cutting, like the example above. Next, movement on to yellow. Select i of the yellow elements (similar a sun ray), right-click and choose attach. Repeat with the teal elements. Since there is only one element in gray, there isn't an selection to attach. Click the light-green Get in button in the upper right-manus corner.
*If you're cutting heat-transfer vinyl, you need to flip your blueprint horizontally earlier you clik the light-green Make it button.
Since you've attached the pattern, all the elements volition cut in the same position as they appear on your design screen.
To cut the design, make sure Mat ane is selected. Click continue. Yous might need to select your machine in the Connect Automobile box. Be sure the dial is set to the cloth you are cutting. Place your gray material on the cutting mat, smooth it out so there aren't whatever wrinkles or bubbles. And then, load information technology into your machine by pressing the up and down pointer push button. Once the C button starts flashing, press it and the machine will start cut.
Once your Cricut has finished cutting the grey material, press the up/downwardly pointer button once again to unload the mat. Then, repeat the above steps with the remaining 3 colors.
I hope this tutorial was helpful and you start using SVG files with your cutter! Be sure to pin this post so you can observe information technology once again!
caldwellmanothaver61.blogspot.com
Source: https://burtonavenue.com/how-to-cut-multi-colored-designs-in-cricut-design-space/
Post a Comment for "How to Upload Multicolor Design on Cricut Design Space"